Python GUI (Tkinter) with Arduino
Today I’ve done a really simple project, the main idea of this project is to build a GUI app to control an arduino board. Of course, controlling an LED would be a really easy way to get started, then we can apply to more complex projects in the future when our skill constantly grows up.
I will separate this project into 2 parts
Part 1 is related to building a GUI app.
Part 2 is to write arduino code to get input data from GUI I’ve created beforehand.
Ok, let’s go into part 1.
Part 1 Designing GUI, and writing code to build it.
First, I have to design buttons to press for sending data to arduino port via UART. In this project, my comport is com7, and baud rate is 96oo. It’s the regular and appropriate values of arduino board, by the way, if you want to connect wifi using ESP8266 or ESP32, you will always notice that these boards use 115200 as its appropiate baud rate.

Writing Python Code
Let’s see in python code, I’ve imported 3 modules; serial, time, tkinter
serial >>> To communicate between arduino and python.
time >>> To manage everything about time.
tkinter >>> To build a GUI app.
import serial
import time
import tkinter
3 functions for 3 buttons
quit (Quit Button) >>> To exit the app whenever we want
set_button1_state (ON Button)>>> To send character “H” to arduino, perhaps turn on an LED.
set_button2_state (OFF Button)>>> To send character “L” to arduino, perhaps turn off an LED.
def quit():
    global tkTop
    ser.write(bytes('L', 'UTF-8'))
    tkTop.destroy()

def set_button1_state():
        b += 1
        varLabel.set("LED ON ")
        ser.write(bytes('H', 'UTF-8'))
        varLabel2.set(b)
        print(b)

def set_button2_state():
        varLabel.set("LED OFF")
        ser.write(bytes('L', 'UTF-8')
This is the part of serial communication, I defined “ser” variable to store data from serial communication, and set for com 7, and 96oo as a com port and baud rate speed respectively. “time.sleep(3)” is to delay for 3 seconds “ser.write” to send ‘L’ to arduino for resetting when it first connects.
ser = serial.Serial('com7', 9600)
print("Reset Arduino")
time.sleep(3)
ser.write(bytes('L', 'UTF-8'))
For further part I have not done to describe today because I am hurry up to go somewhere else for my chilling day now, I’d like to say sorry, and of course, I will update it later or sooner.
Full Python Code
import serial
import time
import tkinter
def quit():
global tkTop
ser.write(bytes('L', 'UTF-8'))
tkTop.destroy()
def set_button1_state():
global b
b += 1
varLabel.set("LED ON ")
ser.write(bytes('H', 'UTF-8'))
varLabel2.set(b)
print(b)
def set_button2_state():
varLabel.set("LED OFF")
ser.write(bytes('L', 'UTF-8'))
ser = serial.Serial('com7', 9600)
print("Reset Arduino")
time.sleep(3)
ser.write(bytes('L', 'UTF-8'))
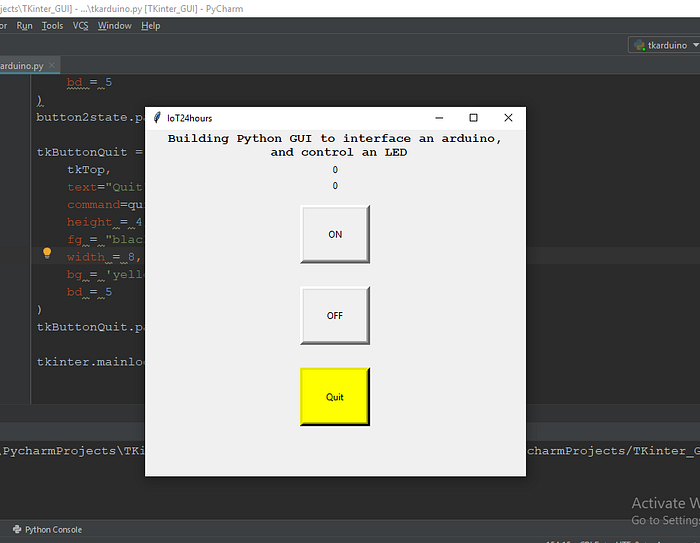
tkTop = tkinter.Tk()
tkTop.geometry('300x200')
tkTop.title("IoT24hours")
label3 = tkinter.Label(text = 'Building Python GUI to interface an arduino,'
'\n and control an LED',font=("Courier", 12,'bold')).pack()
tkTop.counter = 0
b = tkTop.counter
varLabel = tkinter.IntVar()
tkLabel = tkinter.Label(textvariable=varLabel, )
tkLabel.pack()
varLabel2 = tkinter.IntVar()
tkLabel2 = tkinter.Label(textvariable=varLabel2, )
tkLabel2.pack()
button1 = tkinter.IntVar()
button1state = tkinter.Button(tkTop,
text="ON",
command=set_button1_state,
height = 4,
fg = "black",
width = 8,
bd = 5,
activebackground='green'
)
button1state.pack(side='top', ipadx=10, padx=10, pady=15)
button2 = tkinter.IntVar()
button2state = tkinter.Button(tkTop,
text="OFF",
command=set_button2_state,
height = 4,
fg = "black",
width = 8,
bd = 5
)
button2state.pack(side='top', ipadx=10, padx=10, pady=15)
tkButtonQuit = tkinter.Button(
tkTop,
text="Quit",
command=quit,
height = 4,
fg = "black",
width = 8,
bg = 'yellow',
bd = 5
)
tkButtonQuit.pack(side='top', ipadx=10, padx=10, pady=15)
tkinter.mainloop()Part 2 Writing arduino code
You will get confused a bit where is hardware I use for this project. Ok this is good sense. I did not use any led devices, I just use my arduino board. As you know in the past, if you get familiar with arduino, you will see that it is an LED builtin pin attached to pin 13 on its board, and of course, I will use it for this project because now I have no any LEDs. But actually, I really desire to create this post now, so it’s enough for me to get started by using the LED on an arduino board. By the way, if you have your own LED, no problem, you can use it as well, but you have to connect wire to it, and some basic knowledge of circuit.
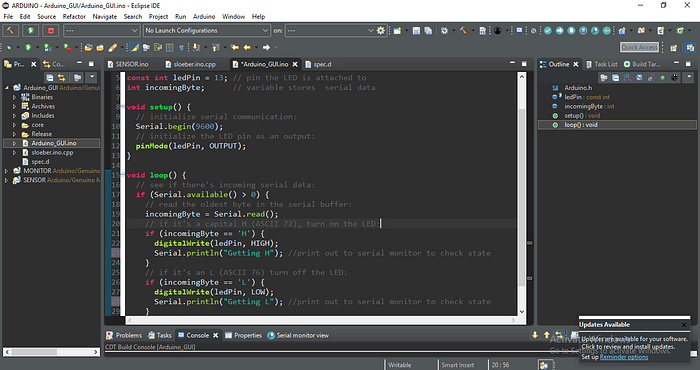
const int ledPin = 13; // pin the LED is attached to
int incomingByte;      // variable stores  serial data
In the void setup had nothing complex, just adding 9600 as baud rate, and determine “ ledPin” to be the output pin.
void setup() {
  // initialize serial communication:
  Serial.begin(9600);
  // initialize the LED pin as an output:
  pinMode(ledPin, OUTPUT);
}
The main idea to write arduino code is to open serial port waiting to get incoming data from GUI. Let’s see in the void loop.
// see if there's incoming serial data:
if (Serial.available() > 0) {
  // read the oldest byte in the serial buffer:
  incomingByte = Serial.read();
when I press the “ON” button, the GUI app will send the character “H” to arduino via serial communication. Then I will write some codes to get that data, and I use the code below.
if (incomingByte == 'H') {
  digitalWrite(ledPin, HIGH);
  Serial.println("Getting H"); //print out to serial monitor to check state
}
//กำหนดเงื่อนไขถ้ารับค่า H เข้ามา แล้วสั่งให้หลอด LED สว่าง จากนั้นทำการปริ้นซ์ คำว่า "Getting H" ออกทางซีเรียลมอนิเตอร์ เพื่อดีบักหรือตรวจสอบดูค่า
This section uses the same idea as the code above, only change “H” to “L” . However, you can use whatever you want such as “Iasluksfhvis” etc. not just fix for “H and L” but as you always notice, the major of arduino programmers love to use L and H so “L” >>> “LOW” as well as “H” >>> “HIGH” because these are meaningful words, if you use meaningful words to declare variables, people will remember you as a good programmer.
if (incomingByte == 'L') {
  digitalWrite(ledPin, LOW);
  Serial.println("Getting L"); //print out to serial monitor to check state
}
Full Version of Arduino Code
// Arduino IDE:
// File -> Examples -> 04.Communication -> PhysicalPixel

const int ledPin = 13; // pin the LED is attached to
int incomingByte;      // variable stores  serial data

void setup() {
  // initialize serial communication:
  Serial.begin(9600);
  // initialize the LED pin as an output:
  pinMode(ledPin, OUTPUT);
}

void loop() {
  // see if there's incoming serial data:
  if (Serial.available() > 0) {
    // read the oldest byte in the serial buffer:
    incomingByte = Serial.read();
    // if it's a capital H (ASCII 72), turn on the LED:
    if (incomingByte == 'H') {
      digitalWrite(ledPin, HIGH);
      Serial.println("Getting H"); //print out to serial monitor to check state
    }
    // if it's an L (ASCII 76) turn off the LED:
    if (incomingByte == 'L') {
      digitalWrite(ledPin, LOW);
      Serial.println("Getting L"); //print out to serial monitor to check state
    }
  }
}
Finally, I’ve completed my GUI app.
You can watch this on my youtube channel, and thanks so much for following me.
https://www.youtube.com/watch?v=mOBdWc9LvD0
Conclusion
Just remember the core concepts of this project are
- Pressing buttons from GUI to send data to an arduino board via serial communication.
- Receiving input data from GUI buttons we pressed before to use that data to apply to if- else conditions to control an LED, or any devices you desire.
Thank you for reading this article, hoping you all enjoy to build your own project, you can design a beautiful GUI app as great as you want, in this project just a simple concept giving you a direction. If you have any problems or questions, then do not hesitate to talk to me and feel free to drop yours in the comment section below, see you next article.
This article is written by: [Sonny STACKPYTHON]